
If you want to know how to build a raised vegetable bed that still produces well in its fifth season, the frame is the easy part.
An afternoon with a drill and some lumber gets you a box.
What decides the harvest is where the box sits, how deep it is, what goes inside it, and how you water, feed and rotate crops after planting.
This guide covers all of that, in the order you will meet each decision.
It suits a gardener with a single bed behind the house and a small commercial grower planning a row of twenty.
The principles are the same. Only the repetition and the irrigation layout change.
Where to put a raised bed: sun, water access and walking room
Most fruiting vegetables, including tomatoes, peppers, squash, beans and cucumbers, need six to eight hours of direct sun a day.
Leafy crops such as lettuce, spinach and chard tolerate four to five hours and often do better with some afternoon shade in summer.
Before you commit to a spot, check it at several points in the day, because a fence or tree that shades the site at 3 p.m. is easy to miss at noon.
Water access matters more than most people expect. A bed you can reach with a hose gets watered; a bed that needs a trip with a watering can gets skipped in the second hot week.
Place the bed within hose length of a tap, or close enough to run a drip line from one.
Leave room to work around it:
- Paths of 18 to 24 inches (45 to 60 cm) are enough for a single gardener on foot.
- Paths of 3 feet (about 90 cm) or more are needed wherever you will push a wheelbarrow, kneel with a tool tray, or open a cold frame.
- Commercial rows need paths wide enough for your cart or mower, and a clear end path for turning.
Choose level ground if you can.
A slope can be built on, but the frame then needs one side set into the hillside or built taller on the low side, which adds work.
Keep the bed away from the roots of large trees and shrubs. Roots grow up into rich bed soil, and they take water and nutrients from your crops.
Choosing the size and height that match your crops and your back
Width is the dimension to settle first.
A bed 4 feet (1.2 m) wide lets you reach the middle from either side without stepping on the soil.
Narrower, at 3 feet, suits shorter gardeners and beds against a wall or fence, where you can only reach from one side, so keep those to about 2.5 to 3 feet.
Length is flexible.
Common lengths are 8 and 10 feet (2.4 and 3 m), partly because lumber is sold in those sizes and partly because covers, hoops and drip kits are easy to match to them.
If you are building a row of beds, make them all the same size. Identical beds let you reuse the same netting, row covers and irrigation parts across the whole row, and they make crop rotation simple to plan.
Height depends on what you grow and how your back feels:
- 6 to 8 inches (15 to 20 cm) works for lettuce, herbs, radishes and other shallow-rooted crops, provided the soil underneath is loosened.
- 10 to 12 inches (25 to 30 cm) suits most vegetables, including tomatoes, peppers and carrots.
- 18 to 30 inches (45 to 75 cm) brings the soil to a height where you can tend it with little bending. It costs more in lumber and fill, and a bed this tall dries out faster at the edges.
Roots will go below the frame into the native soil if it is loose.
So loosen the ground under the bed with a fork before you build, and the effective growing depth is greater than the frame height.
Frame materials compared: wood, metal, stone and blocks, and what each does to your soil
Every material works. They differ in lifespan, cost, how they heat up in the sun, and what they may release into the soil.
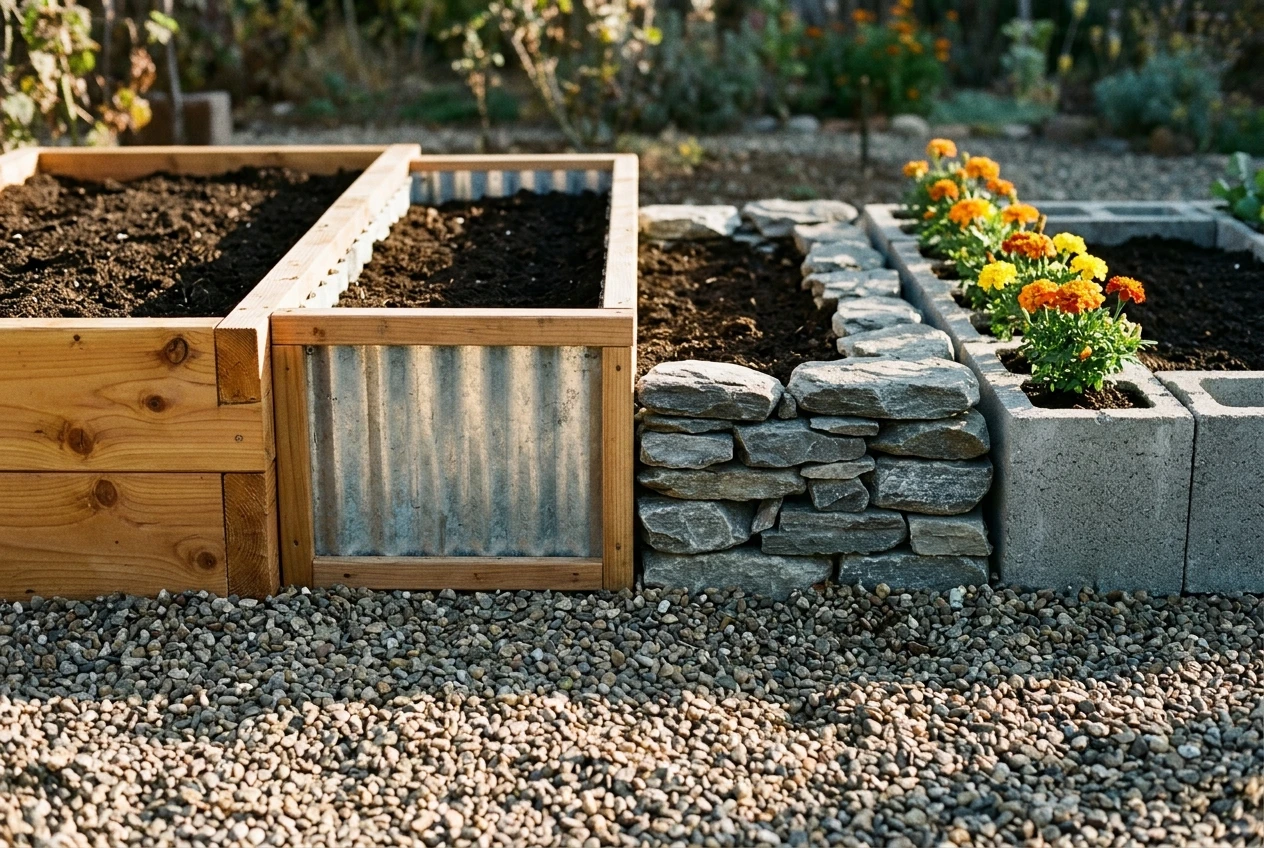
Wood is the usual choice.
Cedar and redwood resist rot naturally and last longer than untreated pine or fir, which rot sooner where the wood meets damp soil.
Modern pressure-treated lumber uses copper-based preservatives rather than the arsenic formulas of the past, and many growers use it.
If you grow organically or sell certified produce, check your certifier’s rules before choosing it. Never use old railway sleepers or ties: they are often soaked in creosote.
Metal, usually galvanized or corrugated steel, lasts a long time and is neat and quick to assemble from kits. The sides can get hot in direct summer sun, which warms the soil at the edges.
That helps in spring and can stress shallow roots in midsummer. Mulch the soil against the wall to buffer it.
Stone and brick last for decades and hold heat steadily, which extends the season at both ends. They cost more and take more labour, and a mortared wall needs a proper footing.
Concrete blocks are cheap, stackable and easy to rearrange. Fresh or crumbling concrete can raise the soil pH a little at the edges, so test the soil after the first season and keep an eye on crops sensitive to alkalinity.
The hollow cores can be planted with herbs or marigolds.
For a first bed, untreated cedar or a quality metal kit gives the least trouble.
For a commercial row, weigh the cost per year of life rather than the purchase price: a frame that costs twice as much but lasts three times as long is the cheaper one.
Building the frame step by step, from levelling the ground to fixing the corners
A simple 4 by 8 foot wooden bed is a good model, and the steps scale to any size.
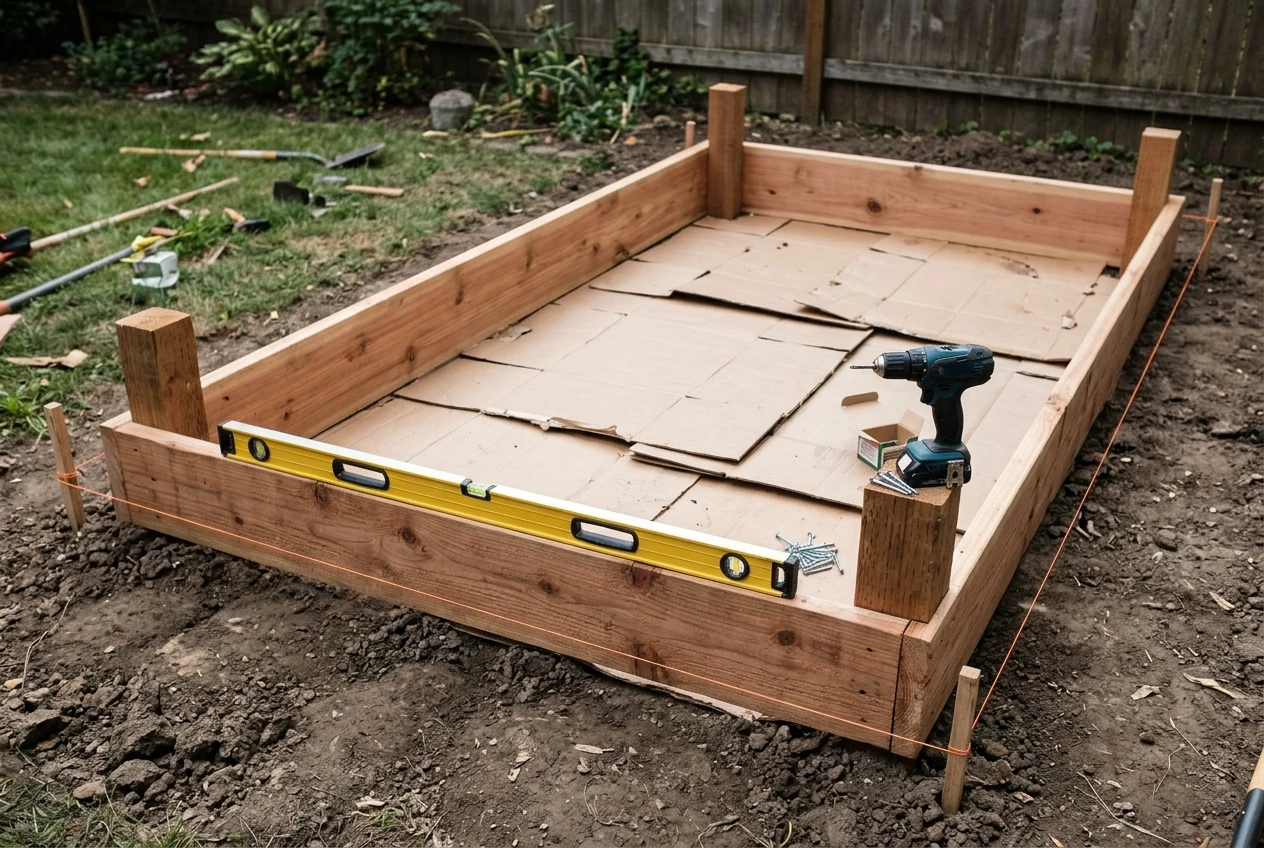
- Mark the footprint. Use string and stakes, and check that the diagonals are equal so the corners are square.
- Clear and loosen the ground. Remove turf or lay it upside down in the bed as a first layer. Break up compacted soil with a garden fork, working it to the depth of the tines without turning it over.
- Level the base. Lay the bottom boards and check them with a spirit level in both directions. Dig out high spots and fill low ones with soil. A frame that sits out of level lets water run to one end.
- Assemble the corners. Pre-drill the holes to prevent splitting, then fix the boards to square corner posts, 4 by 4 inch lumber cut to the bed height plus a few inches below ground. Use exterior-grade or galvanized screws, which resist rust far better than plain steel.
- Brace long sides. A side longer than 8 feet will bow outward under the weight of wet soil. Add a middle stake or a cross-tie across the bed at the halfway point.
- Block burrowing pests if needed. In areas with voles or gophers, staple hardware cloth across the bottom before filling. Wire with a small mesh stops them, and you only get one chance to put it in.
- Lay a weed barrier. Flat cardboard over grass or weeds, with the edges overlapping, suppresses growth below and rots away as roots push through.
Fall is a good time to build. A bed filled now has the winter to settle before spring planting.
Filling the bed: layering a soil and compost mix that holds moisture and drains
Fill is the biggest single cost and the choice that matters most. A good mix holds moisture like a sponge yet drains freely, and stays loose enough for roots to move through.
A reliable general mix is about 50 to 60 percent good topsoil, 30 to 40 percent mature compost, and the remainder coarse material such as perlite, coarse sand or composted bark for aeration.
Several compost sources give a broader range of nutrients than one. Avoid fill that is only potting mix or only compost: potting mix alone is expensive and dries out quickly, and compost alone is too rich and can burn seedlings.
Fill in layers rather than dumping it all at once:
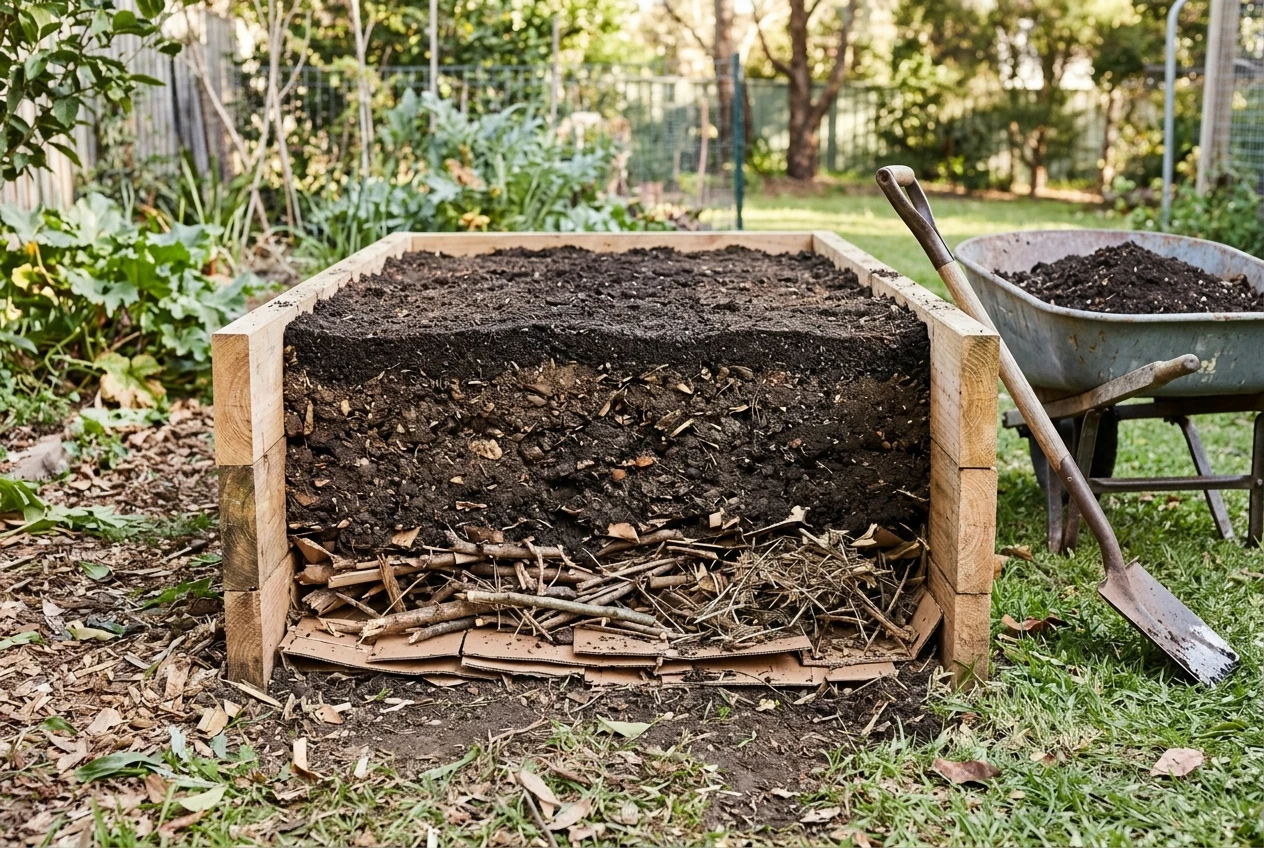
- Base layer: cardboard, then a few inches of coarse material such as small branches or chopped woody prunings, if you have them. They rot slowly and take up space, which cuts the volume of soil you must buy. The pile will shrink as the wood decays.
- Main layer: your soil and compost mixed on a tarp or in a wheelbarrow, then shovelled in and raked level in layers of 4 to 6 inches.
- Top layer: an inch or two of finished compost.
Water each layer as you go, which removes air pockets.
Expect the level to drop by several inches in the first season as the mix settles and the organic matter breaks down.
Order about 10 to 15 percent more fill than the volume calculation suggests (length times width times depth), and keep some compost back for topping up.
Planting plan: spacing, succession sowing and putting tall crops where they won’t shade the rest
Raised beds let you plant closer than in rows, because you never compact the soil and every plant gets rich ground.
Closer does not mean crowded. Leaves that touch and overlap keep air from moving, and that invites disease.
Typical spacings in a bed:
- Lettuce and spinach: 6 to 8 inches (15 to 20 cm)
- Carrots and beets: 2 to 3 inches (5 to 8 cm) after thinning
- Bush beans: 4 to 6 inches (10 to 15 cm)
- Peppers: 12 to 18 inches (30 to 45 cm)
- Staked tomatoes: 18 to 24 inches (45 to 60 cm)
- Broccoli and cabbage: 18 inches (45 cm)
Check your seed packet, as varieties differ.
Succession sowing keeps the bed producing rather than delivering everything in one week.
Sow a short row of lettuce, radishes or bush beans every two to three weeks, and replace each crop as soon as it finishes with something that suits the season: a quick fall crop of spinach or kale after summer beans, for example.
Position tall crops on the side that casts shadow away from everything else. In the northern hemisphere that is the north edge of the bed, so trellised tomatoes, pole beans, cucumbers and corn stand behind lower crops. In the southern hemisphere, put them on the south edge.
If your bed runs east to west, this is straightforward. If it runs north to south, plant tall crops at the north end.
Watering a raised bed: drip lines, soaker hoses and mulch to cut the daily chore
Raised beds drain faster than ground soil and warm up faster, so they also dry out faster. In summer a bed can need water more often than an in-ground plot, which makes a manual routine the first thing to fail.
Two options remove most of the chore:
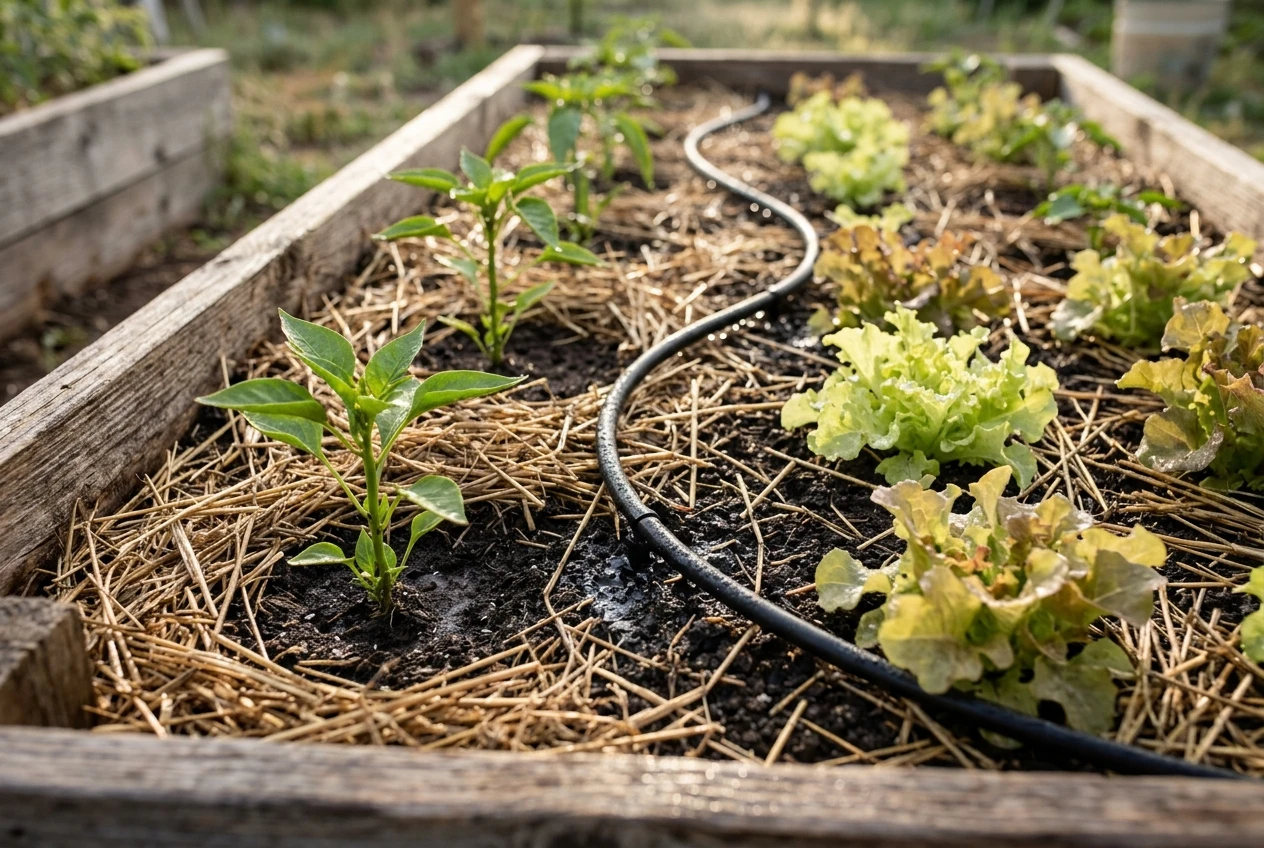
- Drip lines with emitters or built-in drippers deliver water at the base of each plant, wet the leaves less (which lowers fungal disease) and waste little. For a row of beds, a drip kit with a main line and one branch per bed scales cheaply. Add a timer and a pressure regulator, and the system runs without you.
- Soaker hoses are simpler and cheaper. Snake one in an S-shape through the bed and cover it with mulch. They suit small beds but give less even coverage over long runs.
Mulch finishes the job.
Two to three inches of straw, shredded leaves or dried grass clippings slows evaporation, keeps roots cool and suppresses weeds.
Keep it a hand’s width away from the stems of seedlings to prevent rot.
Water deeply and less often rather than a little every day. A good soak encourages roots to go down.
To check, push a finger or a trowel 2 inches into the soil: if it is dry at that depth, water. Morning is best, because foliage dries during the day.
Feeding and rotating crops so the bed does not tire out
A bed full of compost feeds the first crop well.
By the second or third season, the plants have used up part of that supply, and the organic matter has broken down.
Keeping the bed productive depends on feeding it deliberately and not planting the same crops in the same place.
Crops differ widely in how much they take from the soil:
- Heavy feeders: tomatoes, peppers, squash, cucumbers, corn, cabbage and broccoli.
- Moderate feeders: lettuce, spinach, chard, beets and onions.
- Light feeders: carrots, radishes, herbs and most root crops.
- Soil builders: beans and peas, which work with bacteria in their roots to capture nitrogen from the air.
Feed heavy crops with compost at planting and a side dressing of an organic fertilizer midseason.
A soil test every year or two, from a local extension service or a lab, tells you which nutrients are low so you add only what is needed.
Matching the fertilizer to the crop type is a topic of its own, and the guide linked at the end of this article covers it.
Rotation limits the build-up of soil-borne pests and disease and spreads out nutrient demand. Group crops by family, since relatives share the same problems:
- Nightshades: tomatoes, peppers, eggplant, potatoes
- Brassicas: cabbage, broccoli, kale, radishes
- Cucurbits: squash, cucumbers, melons
- Legumes: beans and peas
- Alliums: onions, garlic, leeks
- Roots and leaves: carrots, beets, lettuce, chard
A workable pattern is a three- or four-year cycle: heavy feeders first, then legumes to replenish nitrogen, then leaves and roots, then back to the start.
With a single bed, divide it into quarters and move each family one quarter along every year. With a row of beds, assign a family to each bed and shift them down the row each season.
Draw the plan on paper once and file it, because nobody remembers last year’s layout in spring.
Topping up and resetting the bed each year, plus the common problems to watch for
Once a year, in fall or early spring, reset the bed:
- Clear spent plants. Compost healthy material and discard anything diseased.
- Pull weeds and loosen the top few inches with a fork, without turning the soil over.
- Add one to two inches of finished compost to replace what has settled and been used.
- Check the frame for loose screws, rot, bowing sides or rust, and fix problems before the soil is wet and heavy.
- Mulch over winter, or sow a cover crop such as winter rye or crimson clover, which protects the soil and adds organic matter when dug in or cut down in spring.
Every few years, add more of your soil mix if the level has dropped below the top of the frame.
Problems you are likely to see, and the usual cause:
- Plants wilting even though the soil looks wet: either overwatering and poor drainage, or a mix that has become compacted. Check how the soil feels at 2 to 3 inches.
- Yellow lower leaves: often low nitrogen. A side dressing of compost or fertilizer usually corrects it, but check that drainage is not the cause.
- Blossom end rot on tomatoes and peppers: usually uneven watering that prevents calcium reaching the fruit, not a lack of calcium in the soil. Even out the watering and mulch.
- Slugs and snails: common in damp beds. Clear hiding places along the frame, water in the morning, and use traps or barriers.
- Burrowing pests: if you did not put wire down, you can still add protection around young plants and at the edges.
- Compacted soil: caused by stepping or kneeling in the bed. Keep to the paths, and lay a plank if you must reach across.
- Disease returning each year: a sign the rotation has slipped. Move that plant family to a different bed, and remove all infected debris.
A bed managed this way improves with time, as the compost builds up the soil’s structure and its ability to hold water. That is the real payoff of building it carefully.
Ready to fill your new bed?
Read next: Matching Organic Fertilizer to Heavy Feeding, Leafy and Fruiting Vegetables.