
Roses in cold regions rarely die from one night of low temperature.
They die from a combination of causes that build through winter, and most of them can be reduced with a few weeks of work before the ground freezes. This guide covers how to winterize roses in cold climates, week by week, for a home gardener with a dozen bushes and for a commercial grower with rows of them. It sorts the work into what to stop, what to do, and what to leave alone until spring.
The week numbers count back from the day you expect the ground to freeze solid.
Your local frost dates move that day earlier or later, so the sequence matters more than the calendar.
Why Roses Die in Winter
Three things damage roses in zones 3 to 6, and each one calls for a different part of the routine.
Cold itself. Canes and buds can freeze if the plant is still growing when temperatures drop. A rose that has gone dormant tolerates much colder temperatures than one still pushing soft new growth.
Freeze-thaw swings. A warm spell in midwinter can wake the plant, and the next cold snap damages the tissue that woke up. Repeated freezing and thawing also heaves shallow roots out of the soil. Grafted roses suffer most here, because the graft union sits near the soil surface.
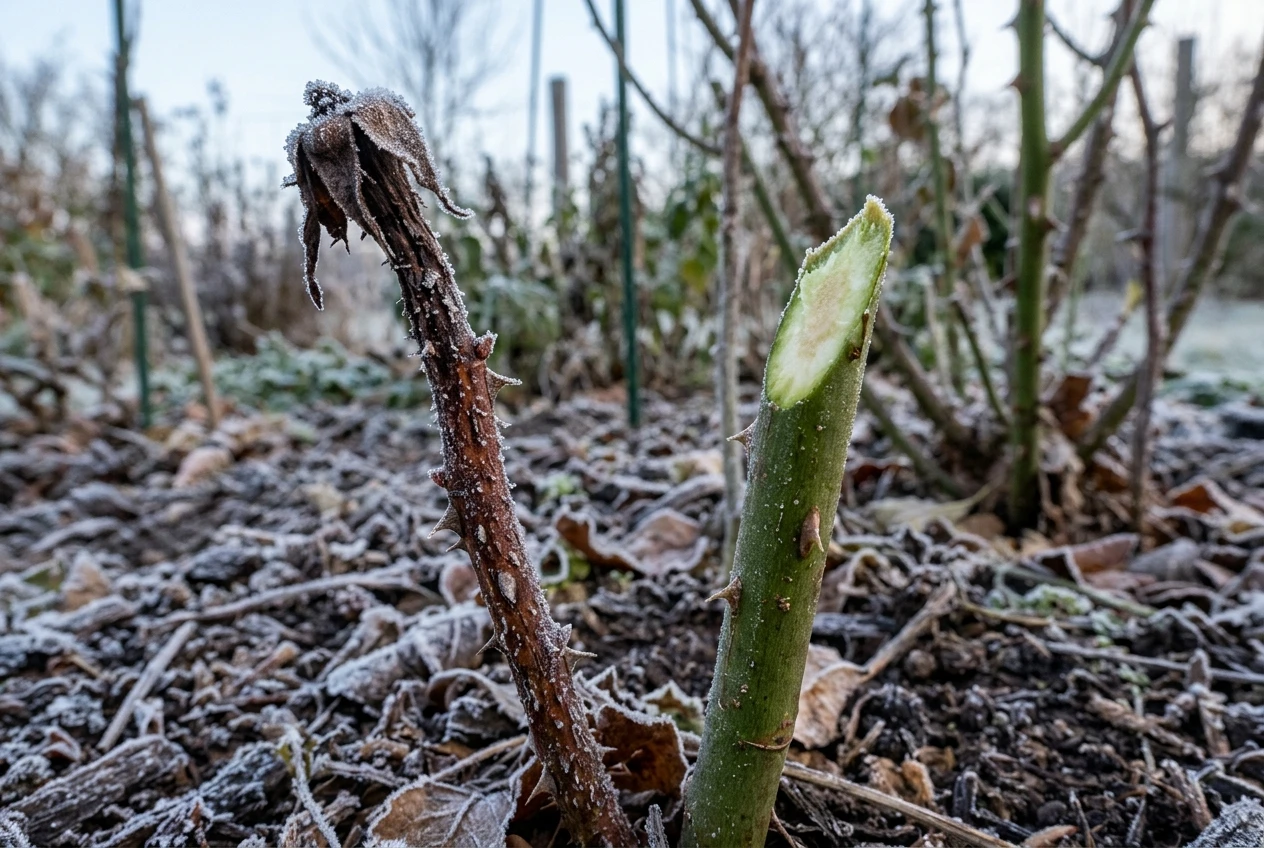
Drying wind. Frozen soil cannot deliver water, but exposed canes keep losing moisture to wind and sun. Canes that look healthy in November can be shriveled and brown by March for this reason.
Almost every step below reduces one of these three. A mound of soil steadies the temperature around the crown, mulch slows the thaw cycle, and burlap or cones cut the wind.
Weeks 4 to 3 Before the Freeze: Stop Feeding and Deadheading
The first job is to stop doing things.
Late feeding with nitrogen pushes soft new growth that has no time to toughen before frost.
Stop fertilizing roses about six weeks before your first expected hard freeze at the latest.
If you want to review which feeds work best earlier in the season, the guide on compost, bone meal or bagged organic feed for roses covers that.
Stop deadheading too. Cutting spent blooms tells a rose to produce more flowers.
Leaving them lets hips form, which signals the plant to slow down and harden off. Rose hips are the plant’s own sign that the growing season is ending.
Also hold off on heavy pruning.
A fall cut stimulates growth near the wound, and open cuts are an entry point for cold damage and disease.
The structural cut is a spring decision, made once you can see which canes survived (see the spring section below).
Home gardener: Take the fertilizer out of the shed rotation and put a note where you will see it. Stop cutting flowers for the vase, unless you remove them above a leaf and accept that the plant keeps trying to grow.
Commercial grower: Set a cutoff date for fertilizer and deadheading crews for each block, based on variety hardiness. Tell the crews directly, because routine deadheading is a habit that carries on unless someone stops it.
Weeks 3 to 2: Clean Up Leaves and Debris
Fungal spores survive winter on fallen leaves and on old canes.
Black spot is the most familiar example. Leaves that stay under the bush give the disease a head start the following spring.
- Rake fallen leaves from under and around each plant and remove them from the bed.
- Do not compost infected leaves unless your pile reaches high, sustained temperatures. Bag them or burn them where local rules allow.
- Remove any dead or obviously diseased canes you can reach, cutting back to healthy tissue.
- Pull weeds from the base so mulch and soil can sit directly against the crown.
For a closer look at how black spot spreads and what to do about it in season, see the guide on stopping black spot on hybrid roses.
Home gardener: An afternoon with a rake and a bucket covers a dozen bushes. Clean the tools you used on diseased wood with rubbing alcohol or a diluted bleach solution before moving to the next plant.
Commercial grower: Use a leaf blower or a sweeper between rows to gather debris, then collect it rather than blowing it into the next row. Disease pressure in a block tells you where to start: clean the worst-affected rows first.
Week 2 to 1: Water Well, Then Mound the Crown
Water deeply before the ground freezes.
Roses go into winter better with moist soil, because dry soil and drying wind together cause the cane dieback described earlier.
A slow, deep soak once or twice in the final weeks is better than a light sprinkle. Stop once the soil begins to freeze.
Mounding comes after that, and it should wait until the plants are dormant.
After a few hard frosts the plant has stopped growing and the soil is cold.
Mounding too early, in warm weather, can keep the crown warm and damp and invite rot or new growth.
To mound a rose:
- Bring soil or compost from another part of the garden. Do not scrape it from around the plant, because that exposes the roots you are trying to protect.
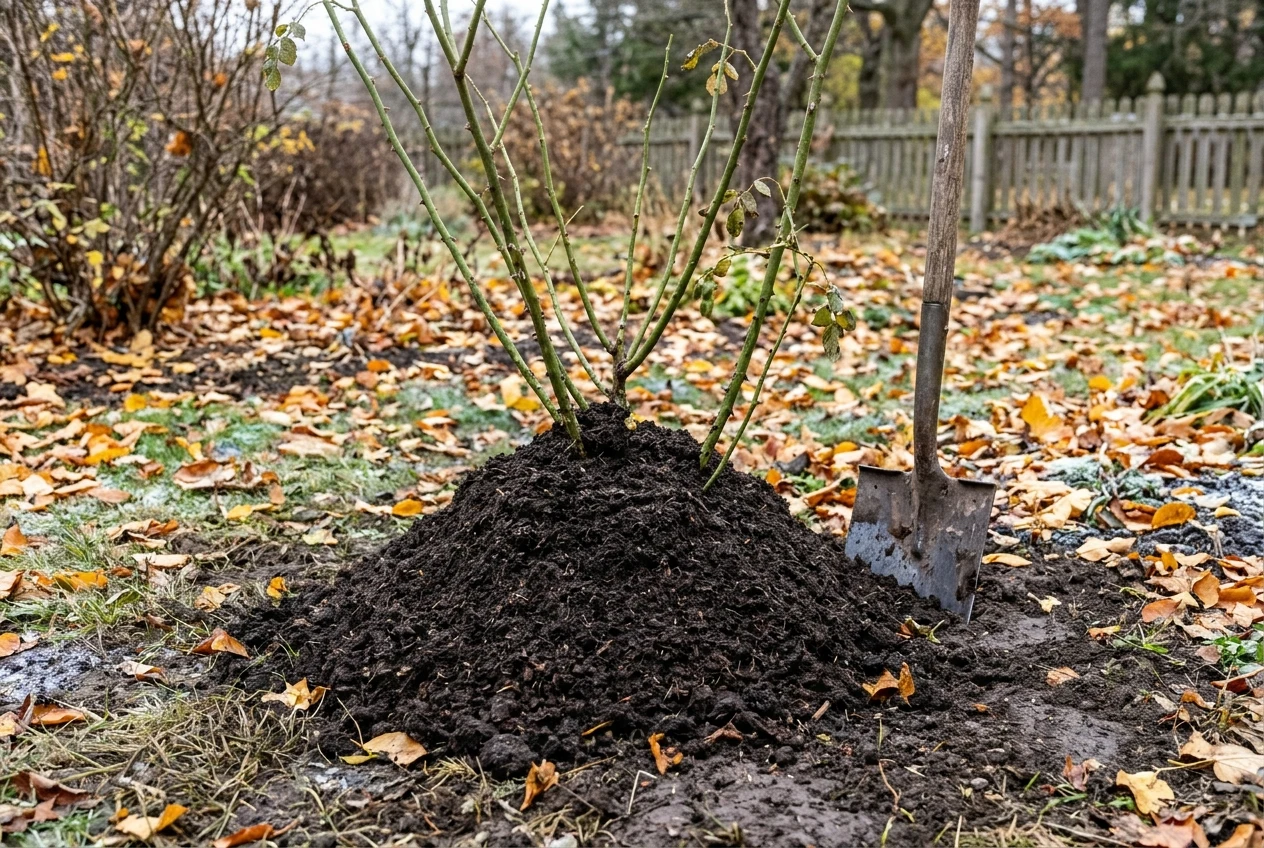
- Pile it over the base of the bush so it covers the crown and the graft union if there is one. A mound of roughly 10 to 12 inches (25 to 30 cm) is a common guide for cold regions, and a taller mound helps in the coldest zones.
- Leave the canes above the mound exposed for now. The mound protects the part of the plant the bush can regrow from.
Even if the top of a rose dies, a protected crown and graft can send up new canes in spring.
This is why mounding is the one step most worth doing.
Weeks 1 to 0: Mulch, Burlap, Cones and Laid-Down Canes
Once the mound is in place, choose the protection that matches your roses.
Mulch over the mound. Add a layer of shredded bark, straw, or compost over the soil. Its purpose is to keep the soil frozen steadily rather than thawing and refreezing.
Apply it after the ground has started to freeze if you can, so rodents are less likely to nest in it.
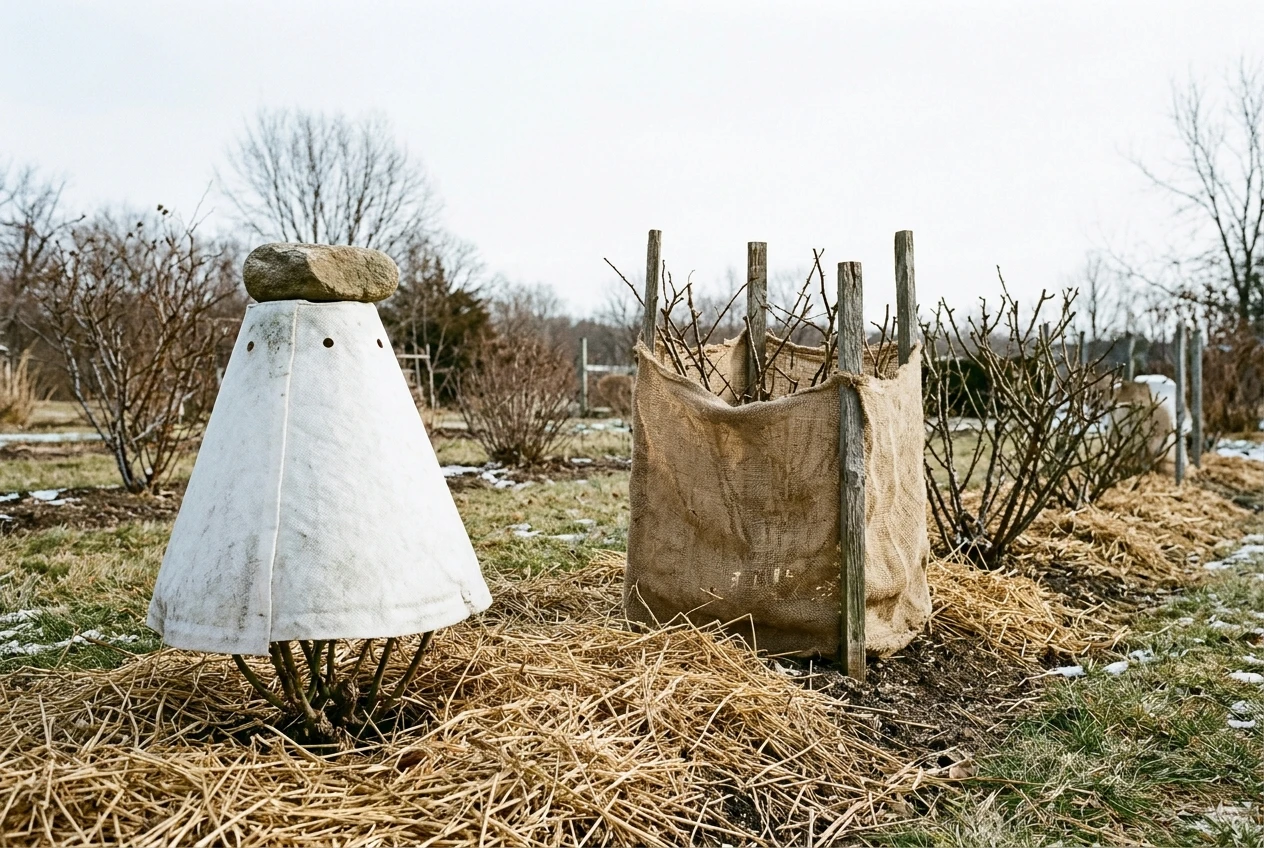
Burlap wraps and screens. For bushes exposed to wind, drive stakes around the plant and wrap burlap around them, leaving the top open.
You can fill the space loosely with leaves or straw. This reduces wind drying without trapping moisture against the canes.
Rose cones. Cones fit over a mounded bush and block wind and sun. They need ventilation. On a sunny winter day the air inside can warm well above the outside temperature, so cut or leave vent holes and weigh the cone down so it does not blow off.
Cones suit upright shrub roses such as hybrid teas and floribundas, and they work best over a mound.
Laying canes down. For tender and long-caned roses, you can loosen the roots slightly on one side, bend the whole plant over, pin it to the ground, and cover it with soil or mulch. This takes more work but gives the canes the same protection as the crown.
Tie long canes together loosely so winter winds cannot whip them against the mound and break them. Cutting very tall canes back a little is acceptable for this purpose, but leave the real pruning for spring.
Climbers, Standards and Grafted Roses
Some roses need more help than a shrub rose does.
Climbers. Climbing canes are long and exposed, which makes them the most vulnerable part of the garden.
Where the variety is borderline hardy for your zone, unfasten the canes from the support, lay them along the ground, pin them down, and cover them with mulch, soil, or a layer of burlap.
Handle them carefully, because older canes crack when bent.
If a climber is reliably hardy in your zone, leaving it on its support and wrapping the canes in burlap may be enough.
Standards (tree roses). A standard rose has a grafted head on top of a straight trunk, so both the trunk and the head are exposed.
In very cold regions, growers wrap the head and trunk in burlap with straw packed inside, or dig the plant partly out, tip it into a trench, and cover it with soil.
The trench method is more work but protects the whole plant.
Grafted roses. Any grafted rose is a risk if the union freezes, because the named variety can die back and leave the rootstock to grow.
Burying the union under a mound is the single most useful measure for these plants.
Own-root roses are less dependent on the mound, though a mound still helps young plants.
If your garden includes a mix of types, protect the climbers, standards, and newly planted roses first. Established, hardy shrub roses can often survive with less.
Scaling Up: Beds and Commercial Rows
The same routine works for large numbers of plants, but it has to be organized differently.
For a home bed of a dozen roses, do each job across the whole bed at once: clean all the plants, water them all, mound them all, then cover them all.
Working by task rather than by plant saves walking back and forth and keeps you from forgetting a bush.
For commercial rows, plan the sequence before the first week begins.
- Divide the field by priority. Grafted roses, young plantings, and exposed rows come first. Established own-root plants in sheltered blocks come last.
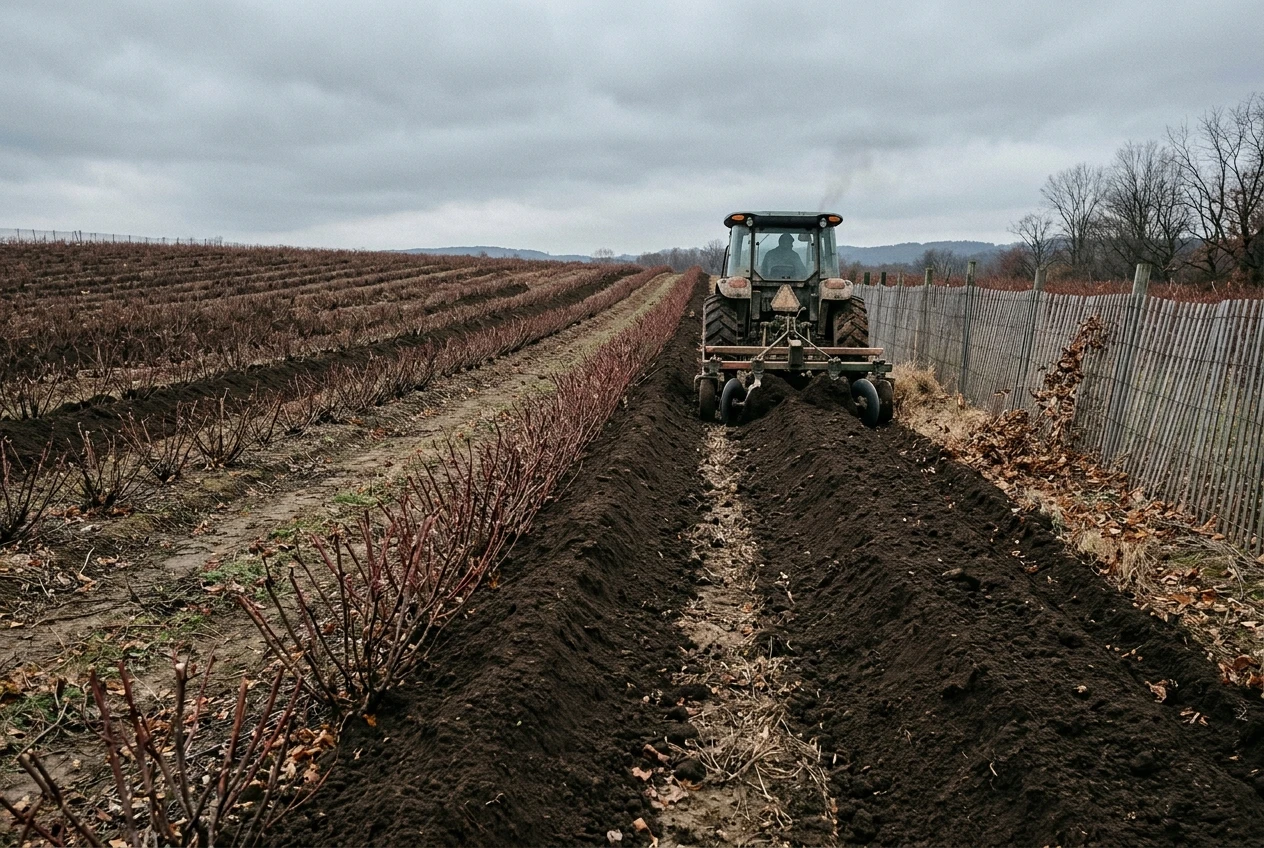
- Mound with machinery where row spacing allows, using a tractor attachment or a front loader to move soil or compost to the base of the plants. Hand finishing around the crown is still worthwhile.
- Spread mulch in one pass per row rather than returning to it later.
- Wind direction matters at field scale. A windbreak, such as a snow fence on the windward side, protects many plants for the cost of one structure.
- Assign each crew one job across all rows (cleanup, then watering, then mounding) so people become fast at that task.
A written checklist per block, with dates and initials, makes it easy to see what is finished when weather shortens the window.
Spring Uncovering and the First Cut
Resist the urge to unwrap on the first warm day. Spring weather in cold regions swings, and a late freeze on newly uncovered canes can undo the winter’s protection.
Remove cones, burlap, and mulch gradually as the weather settles and the soil thaws.
Pull back the mound in stages, since soil that sat against the canes is easier to remove when it is not frozen.
If you laid canes down, raise them once the risk of hard freezes has passed.
Wait for buds to swell and leaves to show before you cut.
Dead wood is obvious at that point: canes that are brown and brittle inside should be cut back until you find green or white pith.
Cutting too early removes wood that might still leaf out.
The full method, including which cuts suit which type of rose, is in the guide on how to prune roses for beginners, season by season.
Materials Checklist to Gather Before the Ground Freezes
Collect these while the ground can still be worked.
- Soil or compost for mounding, brought from another part of the garden or field
- Mulch such as shredded bark, straw, or more compost
- Burlap, frost cloth, or similar breathable wrap
- Stakes or posts to hold wraps and screens
- Rose cones, if you use them, with something to weigh them down
- Twine or soft ties for gathering long canes
- Rakes, a leaf blower, and bags or bins for debris
- Clean pruners and a disinfectant for tools
- A hose or irrigation setup you can run until the soil freezes
Gather the materials from the checklist (mulch or compost, burlap or frost cloth, and rose cones if you use them) before the ground freezes, and bookmark the pruning guide for your spring uncovering.