
How to prune roses for beginners comes down to three questions: which type of rose you have, what time of year it is, and which wood on the plant is dead, damaged or healthy.
Most beginner mistakes come from skipping one of these.
A hybrid tea needs a hard cut in late winter, a once-blooming rose needs almost none until after it flowers, and a climber needs its side shoots shortened rather than its main canes.
This guide sorts the job by rose type and by season, so you know what to cut now and what to leave alone.
It assumes a Northern Hemisphere calendar. If you garden in the Southern Hemisphere, shift the months by about six.
Why pruning decides your structure and your blooms
Modern roses flower on new growth. Every cut you make tells the plant where that new growth will start, because the buds just below the cut wake up and grow.
A cut made just above an outward-facing bud sends the new stem away from the center of the plant. A cut made above an inward-facing bud sends it into the middle, where it will cross other stems.
Structure matters because roses grow best with air moving through them. A plant with an open center dries faster after rain and dew, which helps limit fungal disease.
A tangled plant stays damp and shaded inside, and the thin, weak shoots that grow there seldom carry good flowers.
Pruning also renews the plant. Old canes lose vigor over the years and produce smaller, fewer blooms.
Removing the oldest wood and the weakest growth directs the plant’s energy into strong canes.
If you grow roses for cutting, the cut height has a direct effect on the harvest. Pruning lower generally gives fewer, longer stems.
Pruning higher gives more stems that are shorter. Decide which you want before you pick up the shears.
The tools you need and how to keep them clean
You need very few tools, and quality matters more than quantity.
- Bypass pruning shears. The two blades pass each other like scissors and make a clean cut. Anvil-style shears crush the stem against a flat surface, which damages the tissue you want to heal quickly.
- Loppers. These are for canes too thick for hand shears. If the shears strain or twist, switch to loppers rather than forcing the cut.
- A small pruning saw. Older shrub roses and climbers can have canes thick enough that loppers will not manage them.
- Thick gloves with long cuffs. Rose thorns go through light gardening gloves and scratch bare forearms.
- Eye protection. Springy canes whip back when you release them.
Clean tools prevent disease from spreading.
Wipe the blades with 70 percent isopropyl alcohol or a household disinfectant wipe before you begin, and again between plants.
If you cut into diseased wood, clean the blades before the next cut.
Bleach diluted in water also works, but it corrodes metal, so rinse and dry the blades afterward and add a drop of oil.
Keep the blades sharp, because a dull blade tears the cane and leaves a ragged wound.
Work out which type of rose you have before you cut
The right cut depends on the type of rose. If you do not know yours, check the plant tag, the nursery listing or the order confirmation. Here is how the main types behave.
- Hybrid tea. Upright plants with large flowers, usually one per stem. They respond to a firm late-winter prune. A good example is Just Joey.
- Floribunda. Bushier plants with flowers in clusters. They need a lighter cut than hybrid teas, and Burst of Joy is a floribunda you can use as a reference.
- Repeat-flowering shrub roses. These bloom in waves from late spring until frost and need a moderate, shape-focused prune.
- Once-blooming roses. These flower in one flush, usually in early summer, on wood that grew the previous year. Cutting them in late winter removes the flower buds.
- Climbers. These have long, stiff canes that need training. Some bloom once and some repeat.
If you cannot identify the rose, take the cautious route.
In late winter, remove only dead, damaged and crossing wood, and leave the rest. Then note when and how it flowers this season.
A rose that blooms once in early summer and does not return is a once-bloomer. One that flowers again in late summer is a repeat bloomer.
Next year you will know which rules to follow. For more on the repeat-flowering habit, see the guide to growing repeat flowering roses in a garden.
The three cuts that matter: dead, damaged and crossing wood
These three cuts apply to every rose, whatever its type and whatever the season. Make them first, then decide what else the plant needs.
Dead wood. Dead canes are brown or black, dry and shriveled. Check by scraping the bark or cutting a small section: living wood has a white or pale green center, while dead wood has a brown or gray center. Cut back, a little at a time, until you reach wood with a white center. If an entire cane is dead, cut it off at the base.
Damaged wood. Remove anything broken, split or cracked, and any cane with sunken, discolored patches (cankers). Cut well below the damage into healthy tissue.
Crossing wood. When two canes rub against each other, the friction wounds the bark and gives disease a way in. Take out the weaker of the two. Also remove canes growing toward the center of the plant, so the shape stays open.
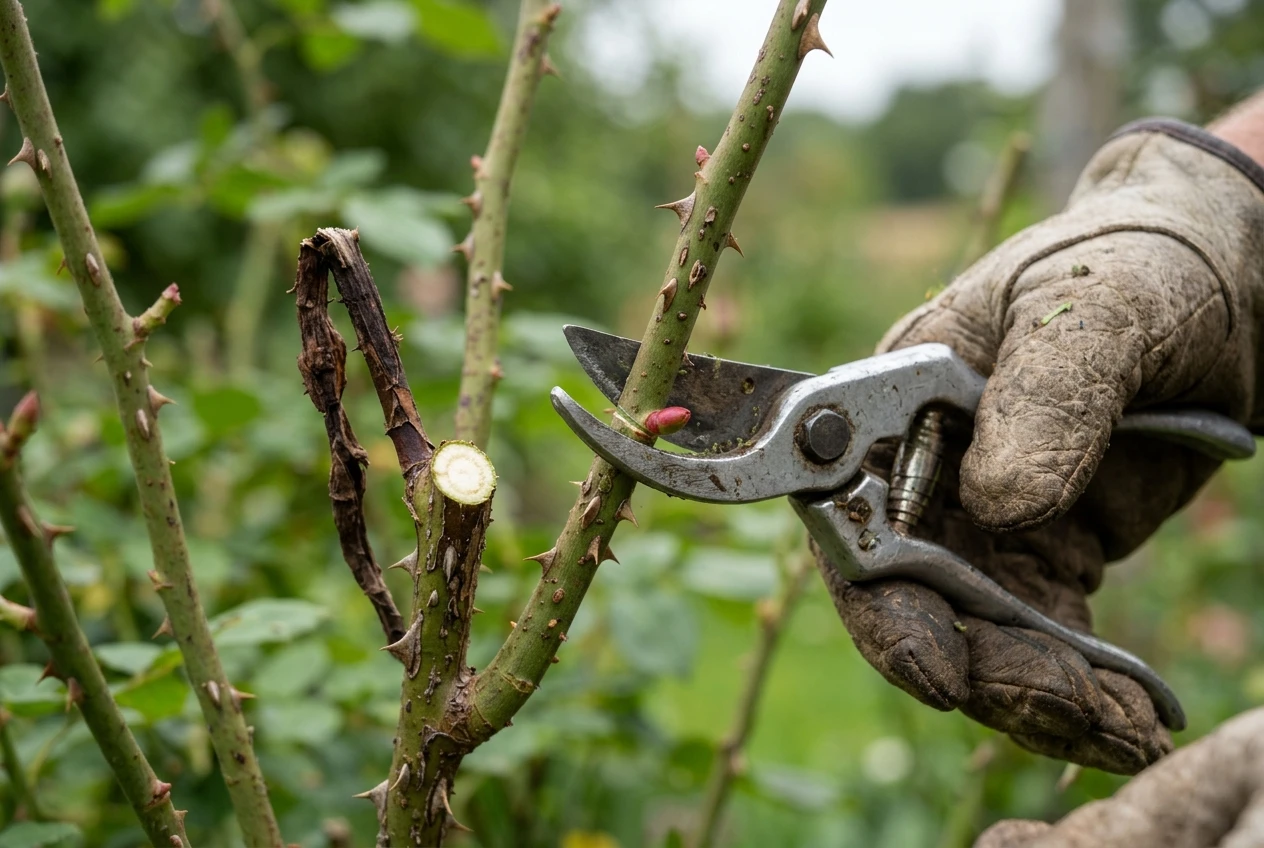
Make every cut about a quarter inch above a bud, sloping away from the bud at roughly 45 degrees so water runs off.
Choose a bud facing outward. A cut too close to the bud can damage it, and a cut too far above it leaves a stub that dies back.
As a bonus cut, remove spindly shoots thinner than a pencil.
They rarely produce good flowers and crowd the center of the plant.
Late winter and early spring: the main prune, step by step
The main prune takes place when the plant is leaving dormancy.
In cold climates, that means late winter or early spring, when the buds begin to swell and show a hint of red or green and the worst frosts have passed.
In mild climates, it can happen earlier, in mid to late winter.
Pruning too early risks frost damage to the new growth that follows. Pruning too late wastes the energy the plant has already put into growth.
Follow this order for hybrid teas, floribunda and repeat-flowering shrub roses:
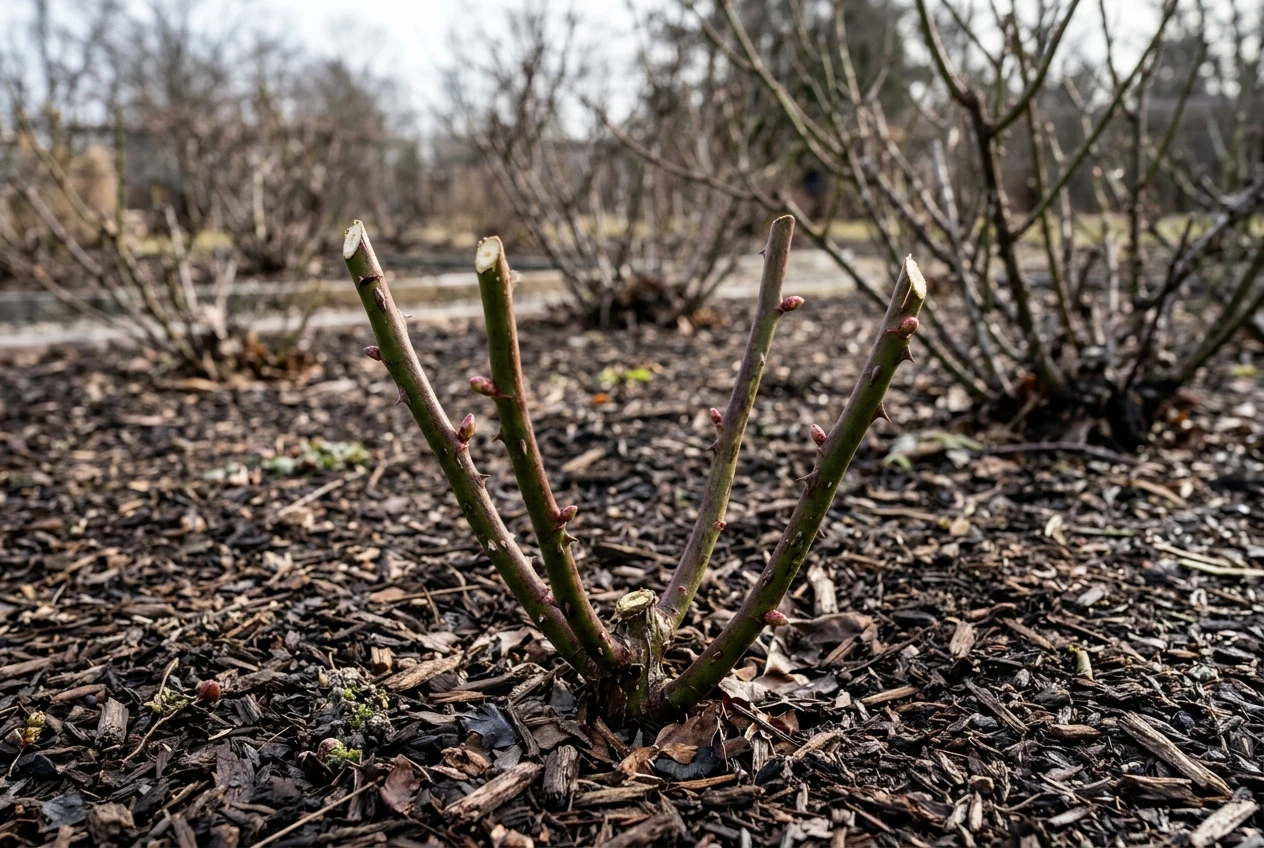
- Clean your tools and put on your gloves.
- Remove the dead, damaged and crossing wood as described above.
- Remove weak growth thinner than a pencil.
- Choose your framework. Keep the strongest, healthiest canes, spaced so that air can pass between them. For a hybrid tea, three to five good canes is a common target.
- Shorten the remaining canes. Cut each one to just above an outward-facing bud.
- Remove old, unproductive canes at the base if the plant is crowded. Spread this over a few seasons if the plant has a lot of old wood, rather than removing everything at once.
- Clear fallen leaves and cut stems from the ground around the plant.
How much you shorten the canes depends on the type of rose:
Rose type How hard to cut in late winter
Hybrid tea Hardest cut: remove roughly half or more of the height, leaving a few strong canes
Floribunda Moderate cut: reduce by about a third to a half, keeping more canes than a hybrid tea
Repeat-flowering shrub Light to moderate cut: reduce by about a third and shape the plant
These are guidelines, not fixed measurements. In a cold climate, canes often die back over winter, and you may end up cutting lower simply to reach healthy wood.
In a mild climate, you may leave more height. Let the white center of the wood and the location of live buds guide you more than a ruler.
A harder cut makes fewer, bigger flowers on longer stems, which suits cutting beds. A lighter cut makes more flowers on a bigger plant, which suits borders and hedges.
Summer deadheading and autumn tidying, and why November is not the time for a hard cut
Summer deadheading
Repeat-flowering roses bloom again faster if you remove spent flowers.
Follow the stem down from the faded bloom to the first leaf with five leaflets, and cut about a quarter inch above that leaf, just above an outward-facing bud.
Cutting to a five-leaflet leaf usually means the new shoot has the strength to carry another flower.
Cutting blooms for a vase works the same way as deadheading, so cut-flower growers are already doing this as they harvest.
Take the stem above a five-leaflet leaf and leave enough foliage on the plant to keep it growing.
Use deadheading time to look for problems.
Remove any leaves with black spots or yellowing, and take them away from the bed rather than leaving them on the soil.
Autumn tidying
In autumn, the goal is to tidy, not to prune.
Pick up fallen leaves, remove canes that are clearly dead or diseased, and cut off any long whippy stems that could rock in the wind and loosen the roots.
A modest trim of these tall stems is enough.
Some gardeners also stop deadheading in the last few weeks before the first frost, which lets the plant begin to slow down and form hips.
Why not a hard cut in November?
A hard cut stimulates the plant to grow new shoots.
If you make one in November in a region with frost, those shoots appear just before cold weather and are too soft to survive it.
The new growth dies back, and the fresh cuts and open wounds remain exposed through winter.
The plant also loses stored energy that it would have used to start growth in spring.
If you are reading this in November in a climate with frosts, put the shears down apart from tidying and removing obviously dead or diseased wood.
The main prune comes in late winter or early spring.
Climbers and once-blooming roses follow different rules
Climbers
A young climber needs very little pruning.
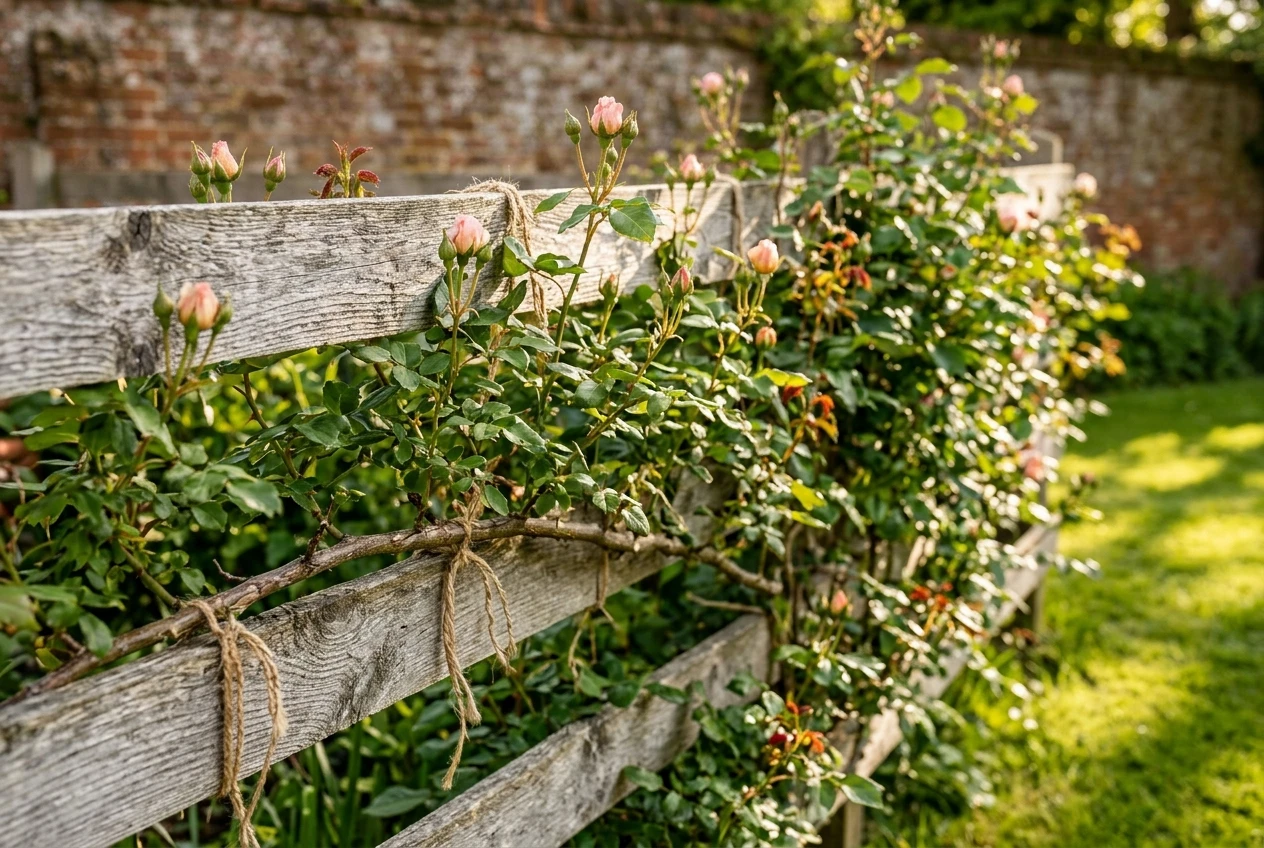
In the first couple of years, remove dead or damaged wood and concentrate on training the long canes along a support.
Tie the canes as close to horizontal as the support allows.
Horizontal canes tend to produce more flowering side shoots along their length than canes tied straight up, which put their energy into the tip.
Once the plant is established, prune in late winter:
- Remove dead, damaged and crossing wood.
- Keep the main framework canes and tie them in.
- Shorten the side shoots that flowered, cutting them back to two or three buds from the main cane.
- Every few years, remove one of the oldest canes at the base to encourage a fresh replacement.
A repeat-flowering climber such as Joseph’s Coat can be deadheaded through the summer like other repeat bloomers.
Check whether your climber blooms once or repeats before you prune, because that decides the timing.
Once-blooming roses
Once-blooming roses, including many old garden roses, form their flower buds on last year’s wood.
If you do the main prune in late winter, you remove the flowers you are waiting for.
Prune them straight after the flush of flowers ends.
At that point:
- Remove dead, damaged and crossing wood.
- Take out some of the oldest canes at the base, so that younger canes carry the next year’s blooms.
- Shorten overly long shoots lightly to shape the plant.
Wood that grows after pruning will carry next year’s flowers, so cutting hard late in the summer or in autumn removes buds. In late winter, restrict yourself to removing dead or damaged wood only.
What to do after pruning: feeding, mulching and disease prevention
Clean up straight after pruning.
Rake up all the cuttings and fallen leaves, and dispose of them in the trash or a municipal green waste collection.
Avoid adding diseased material to a home compost pile, where it may not get hot enough to kill the spores.
Clearing the area reduces the number of fungal spores that can overwinter near the plant and splash onto new growth in spring.
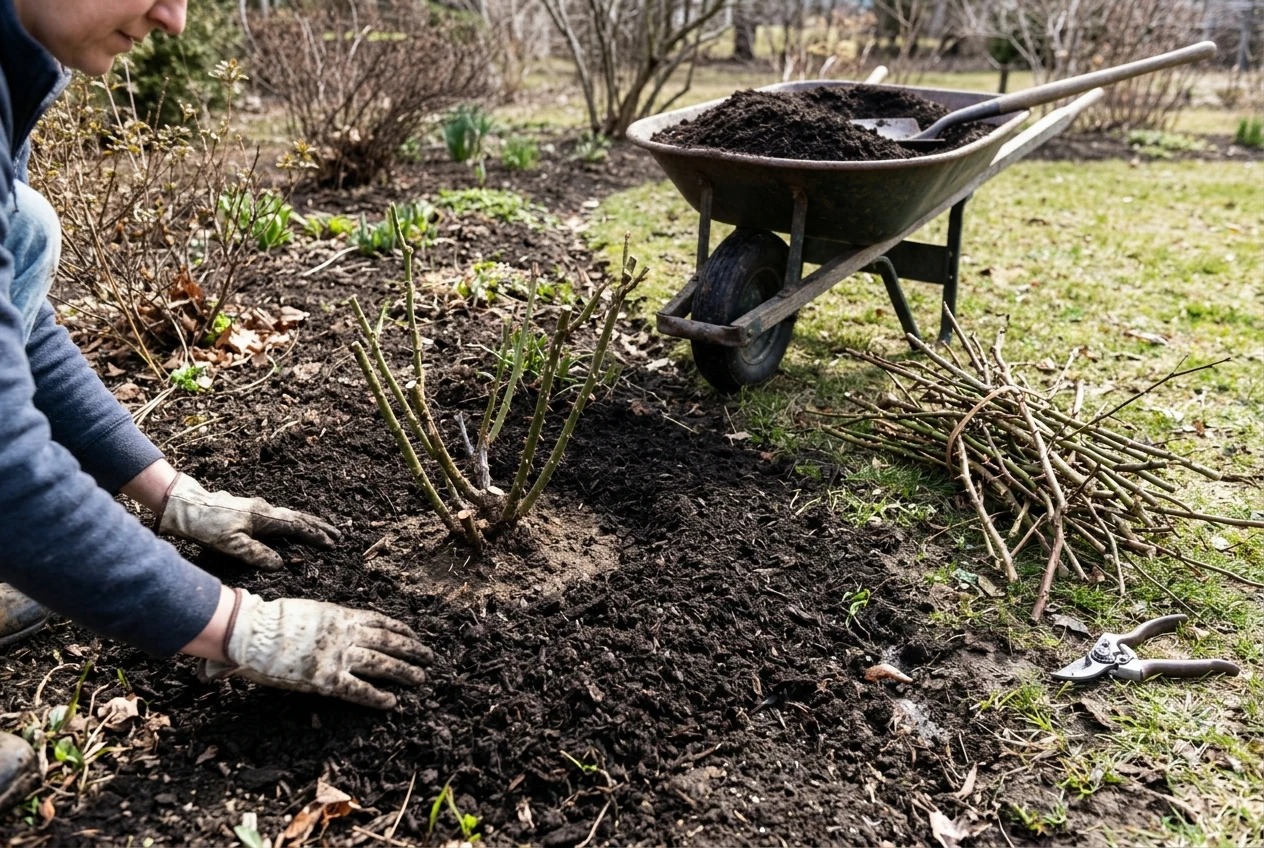
Next, spread a layer of mulch about two to three inches deep over the soil around the plants.
Keep it a few inches away from the base of the canes so that they stay dry at the crown.
Mulch holds moisture in the soil, suppresses weeds and protects the shallow roots from temperature swings.
Feeding comes when the plant starts growing again.
New leaves show that the roots are active and ready to take up nutrients.
Water well after feeding so the nutrients move down toward the roots, and keep watering regularly in dry spells through the growing season.
Roses that were pruned open and clean are less likely to get leaf diseases, but good habits help too.
Water at the base of the plant rather than overhead, and water in the morning so the leaves dry quickly. For a complete plan, see this guide to stopping black spot before it starts.
Before your first cut, check the recommended pruning shears, loppers, gloves and sterilising supplies on this site so you start with tools that make clean cuts and are easy to keep disinfected.
Once the pruning is finished, read the guide to feeding roses with compost, bone meal or bagged organic feed to decide what to apply as the new growth appears.